In previous post, we discussed about How to install XAMPP on windows. Now lets see how to configure XAMPP on windows.
Once you install the XAMPP Server successfully on your local machine. Now its time to open and test it.
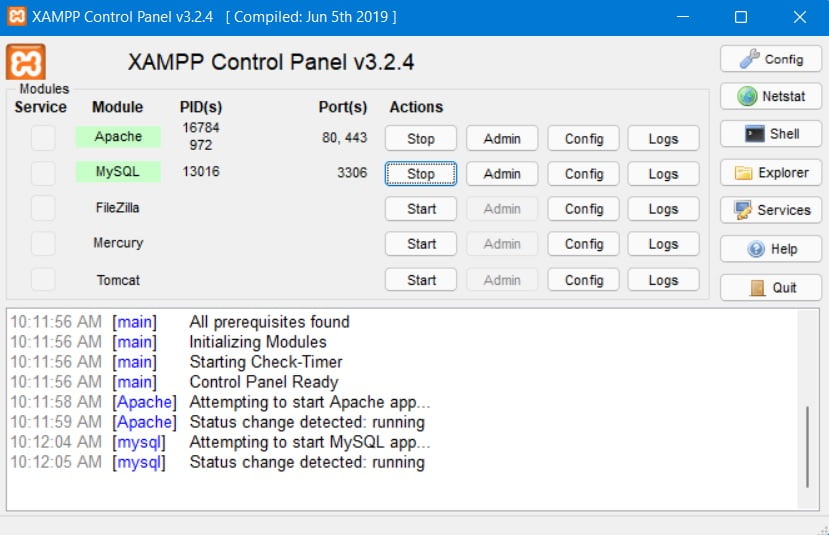
Open the XAMPP server, you will see a short and simple user interface with modules like – Apache, MySQL, FileZilla, Mercury and Tomcat. From this interface you can access MySQL Database, Admin, logs and configurations to change port settings and many other options.
Below are the steps you need to follow to configure XAMPP on windows-
- Launch the XAMPP server, click on the button beside Apache, you can Start/Stop Apache from this button. Once Apache starts, you will see it should starts automatically on ports 83,443. You can access Apache’s dashboard by clicking Admin button next to Start/Stop button or via URL – http://localhost/dashboard/ in your favorite browser.
- Once Apache starts, then click on Start button beside MySQL, it will starts on port 3306. If any windows security alert comes, you need to select “private networks” option. You can access Apache’s dashboard clicking Admin button next to Start/Stop button or via URL – http://localhost/phpmyadmin/ in your favorite browser.
That’s it. You are ready to go. If all modules starts means you have successfully installed and configure XAMPP on windows as your local development environment. It’s now ready to host any PHP website or WordPress theme.
Hope you understand the above steps. Below is the screenshot for your reference-

- Config- to configure overall XAMPP settings (like port numbers, DB username and passwords)
- Netstat- display all active TCP connections (and ports) on your computer
- Shell- starts XAMPP in a custom command line (CMD)
- Explorer- opens the XAMPP root folder
- Services- shows all Windows services under Microsoft Management Console
- Help- For any help/queries
- Quit- Shutdown XAMPP server
Related blog – How to install XAMPP on windows?


